
GA4 Migration: Step-by-Step UA to GA4 Transition Guide
Paul Jarvis · Feb 7, 2023The inevitable has arrived: it’s time to migrate from UA to GA4. Universal Analytics days are coming to an end, and we must be ready for it.
From July 1st, your Universal Analytics will stop reporting data - it will be a sudden process without precedents, but it is what Google must do to change the way they store, move and collect data through Analytics.
For many, migrating from UA to GA4 is a hard pill to swallow, but it must be done either way. Do not despair: we are ready to show you a step-by-step UA to GA4 transition guide that everyone will comprehend.
5 Common UA to GA4 Migration Questions and Their Answers
Google Analytics 4 will be the new analytics tool that your Google Analytics account will use, and although not everyone is on board with this change, the truth is that this new version comes with certain benefits attributed to the newly implemented event-based data model.
Nonetheless, before you take a leap of faith and move from UA to GA4, there are five fundamental things that you must keep in mind.
1. Why Must I Switch from UA to GA4?
Your Universal Analytics upgrade is not optional - you must switch from UA to GA4 because, after D-day (July 1, 2023), Universal Analytics will stop collecting data altogether.
These changes are motivated due to privacy concerns regarding the way Google Analytics uses and processes data online.
Thus, Google Analytics 4 will implement automatic privacy enhancements that attempt to comply with GDPR regulations. For instance, GA4 does not collect users’ IP addresses and facilitates data deletion while minimizing data retention time frames. That’s why moving from UA to GA4 is mandatory for everyone.
2. Can I Import UA Data to GA4?
No. UA and GA4 use different data models. Universal Analytics is session or hit-based, whereas Google Analytics 4 is event-based.
This means that your historic data cannot be moved 1:1 from UA to GA4. This is one of the main key factors that differentiate GA4 vs Universal Analytics, and although GA4 provides more data over time, these significant changes make it impossible to simply move your UA data to GA4.
3. Will I Lose Data Moving from UA to GA4?
Although you can’t simply import data from your old UA property to your new GA4 property, data loss will not be an issue as long as you consider all the data factors on both properties while the migration process takes place.
Google understands this, which is why there are dual-tagging features that allow you to keep collecting raw data on both GA4 and UA properties simultaneously until July 1, 2023, so the learning curve is easier to handle for you.
Thus, if you properly set all things up, then losing data will not be the biggest of your problems.
But, if you fail to properly migrate from the old tool to the new tool, then you will indeed lose some valuable data.
4. When Should I Move from UA to GA4?
Google announced Google Analytics 4 three years ago, and they recommended making the switch from UA to GA4 in July, 2022, provided that you want year-over-year data to work on.
If you haven’t switched yet, then the best way to enjoy all the benefits provided by Google Analytics 4 is to make the switch now so you can start collecting data properly.
That way, before July 1, 2023, arrives, Google Analytics 4 will be ready to work on your property with enhanced tools, such as predictive metrics.
Either way, you can set up a new property as late as July 1, 2023, if you want, but keep in mind that new properties will start from scratch while UA data will not be collected anymore.
5. What Will Happen to My Universal Analytics Data?
Google decided that users will be able to access data from Universal Analytics for at least six months after July 1, 2023.
Although the best practice is to make the switch way before this date, you will still be able to check your old UA data for a while after Google finally discontinues previous versions of their tools.
Step-by-Step UA to GA4 Transition Guide
The best time to migrate from UA to GA4 is right now. Completely moving your historical data from UA to Google Analytics 4 is not possible, but if you make the change with enough time, then GA4 will have something to work upon.
In order to make things right, follow the step-by-step guide to migrate from UA to GA4 in a truly efficient way.
Step 1: Audit Your Universal Analytics Property
The first thing that you must do is audit your Universal Analytics Property correctly. It is fundamental to understand all the little (and not so little) pieces of information that UA has recorded over the past few months so you can later “move them” into GA4.
Make a report of all your valuable data points in Universal Analytics, and save them in your preferred format (CSV, PDF, Google Sheets, etc.).
Once you are fully aware of the important data factors that you want to replicate in Google Analytics 4, it’s time to move on to the setup assistant.
Step 2: Start Switching from UA to Google Analytics 4
Open your Universal Analytics Admin panel, and at the very top of the screen, you will see a Google disclaimer that says that you must move to GA4 because UA will no longer process data after July 1, 2023.
This disclaimer has probably been there for a while, and you can’t hide from it anymore - click on “Manage GA4 migration” and let’s get started with your new property on GA4.

Step 3: Get Started with the Google Analytics 4 Property Setup Assistant
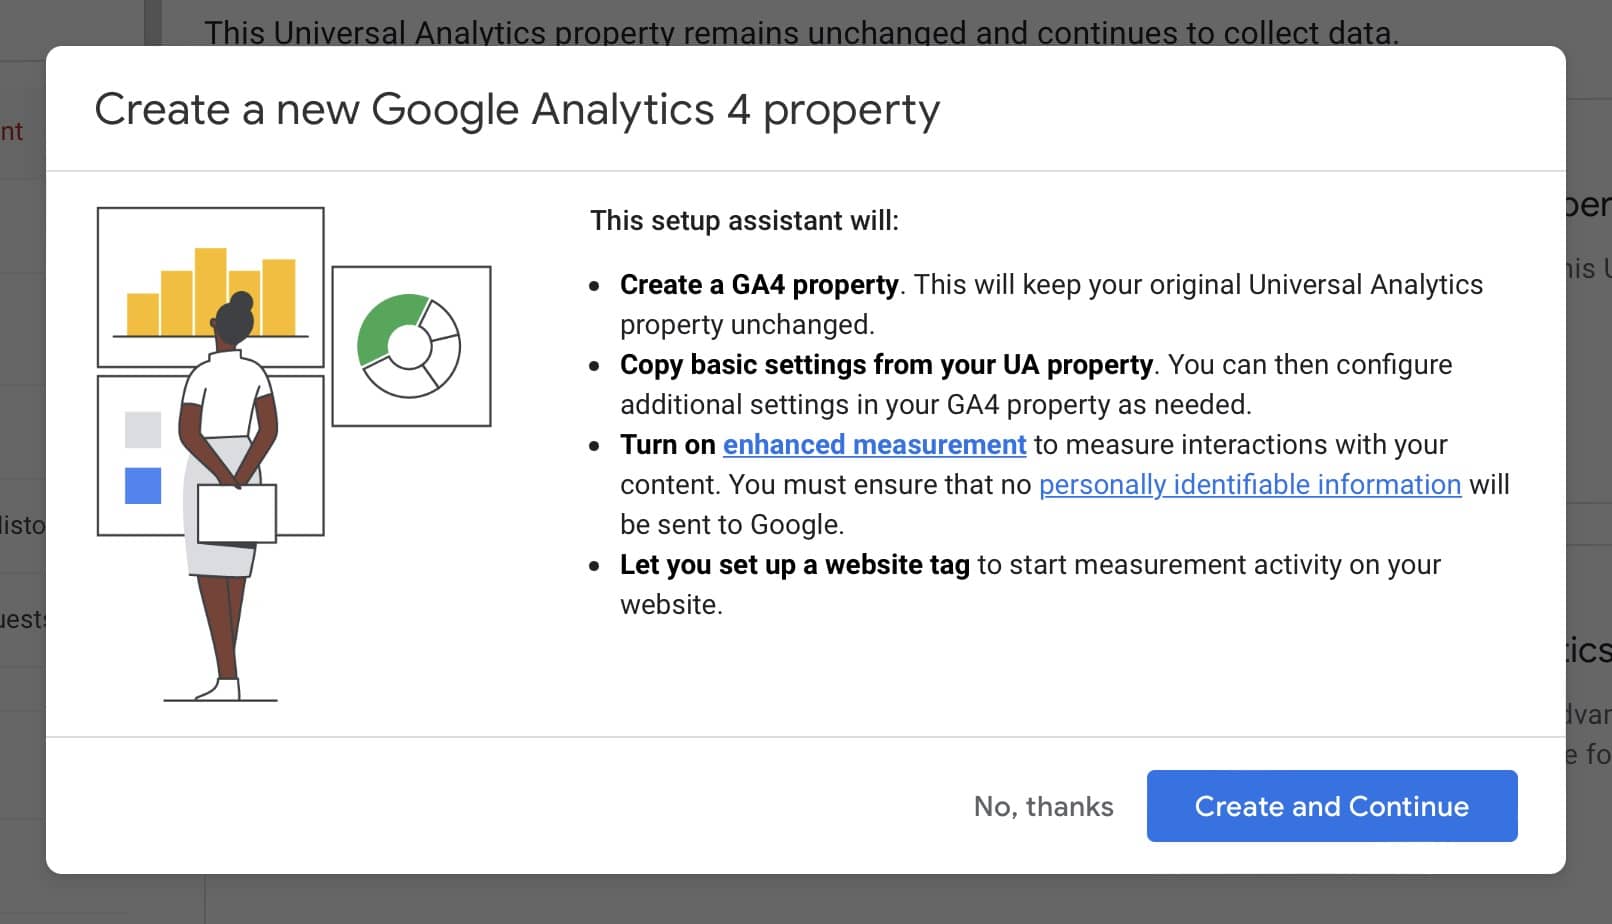
The Google Analytics 4 Property Setup Assistant will open. In order to create a new property on GA4, simply click on “Get Started”, and the property will be automatically created.

The setup assistant will inform you about further steps: it will create a new GA4 property, copy your very basic settings into it, start collecting data on your new property, and give you the option to turn on enhanced measurement if needed (we’ll get to this point in no time).
Click on “Create and Continue,” and move on to the following screen.
And just like that, your new GA4 property has been created! But you are not ready yet - this is just the basics.
Select “Go to your GA4 Property,” and continue with the following step.
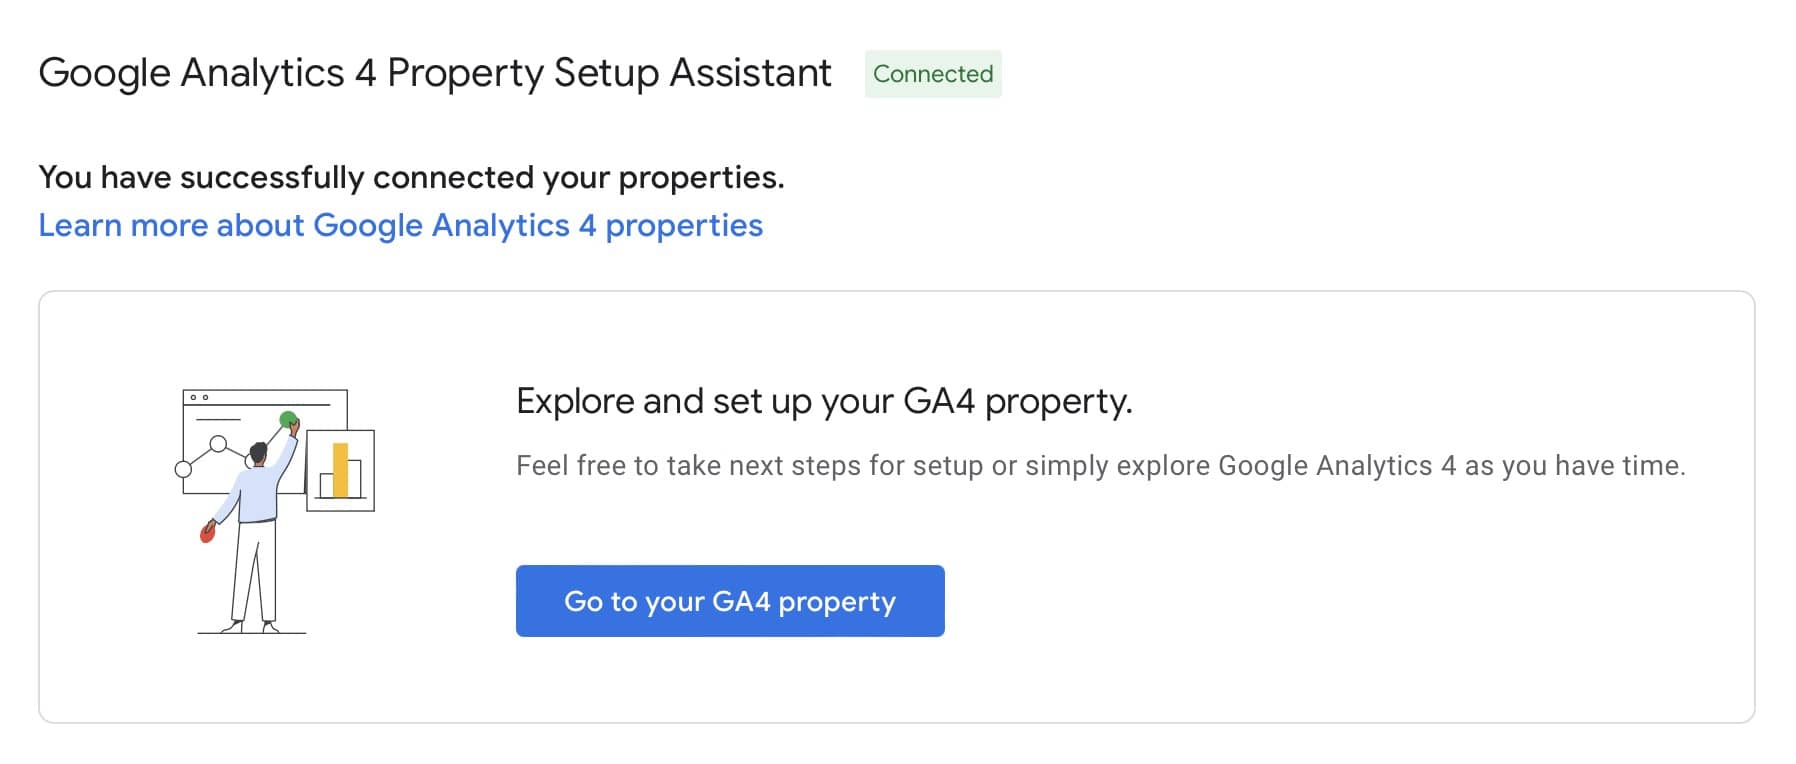
Keep in mind that your UA account will remain unchanged - it will still perform data collection duties until July 1, 2023, and you can click on “Open Connected Property” in case you want to check UA data.

Step 4: Configure Your Google Tag Manager
When you go to the main Data Stream Interface on Google Analytics 4, you will be informed that data collection isn’t active for your website.
This means that Google Analytics 4 is not collecting any data because you haven’t set your Google Tag Manager on your website yet.

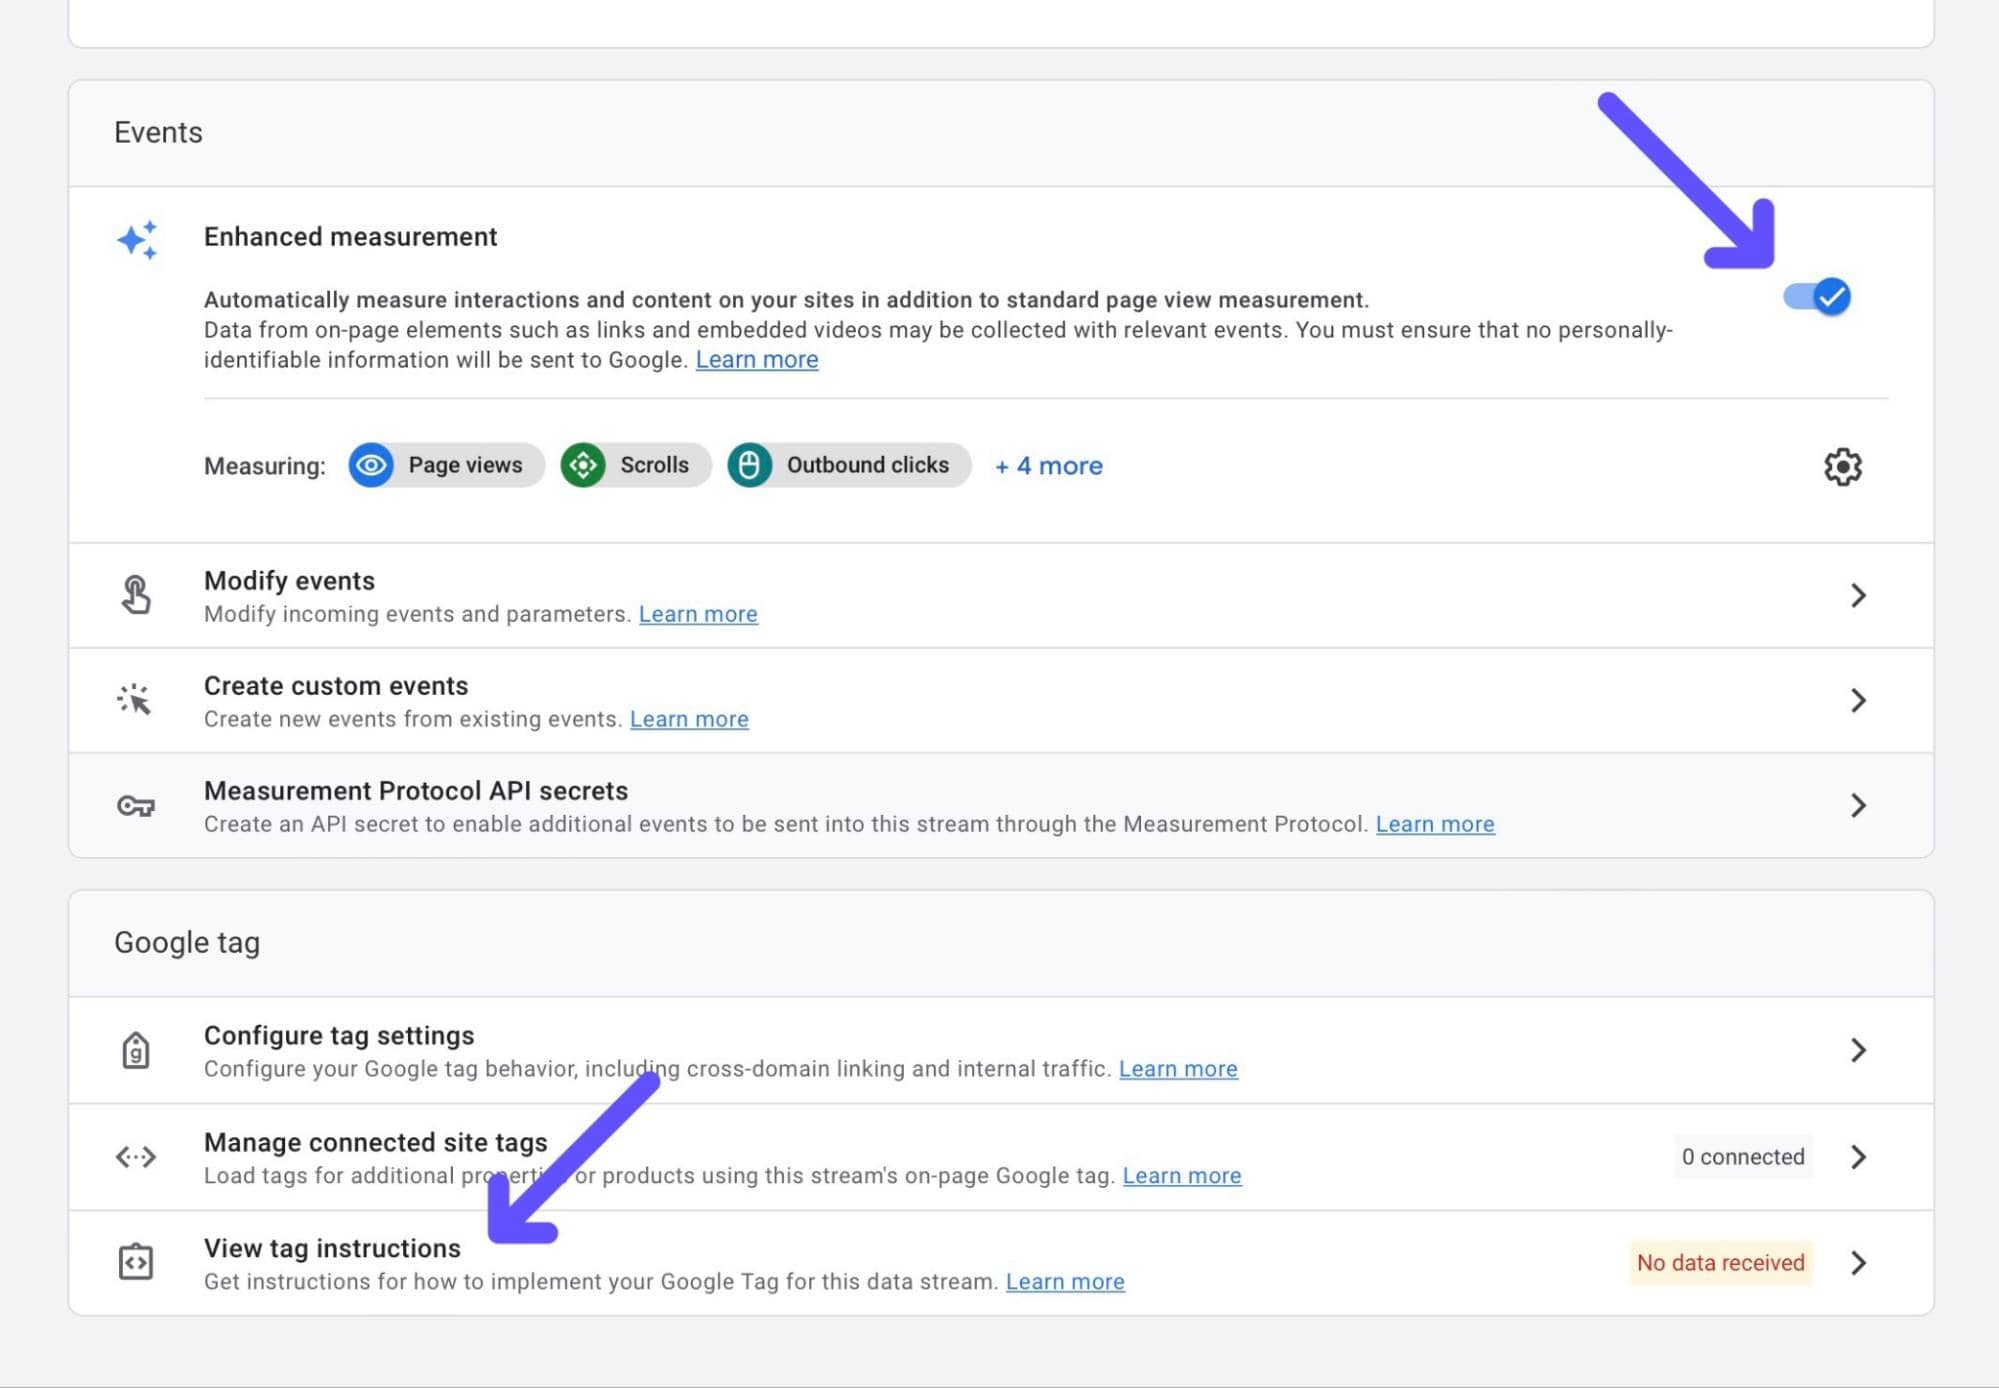
Firstly, make sure to turn on Enhanced Measurement on your property. Since Google Analytics 4 data model is based on events, Enhanced Measurement will simply activate recommended events automatically so the tool can properly track them after setting up your Tag.
Then, click on “View Tag Instructions.”
Step 5: Install Your Google Tag
Now, in order for GA4 to work, you need to install your new GA4 tag ID on your site. There are two ways to do this: the easy way, using your builder or CMS; and the “medium effort” way, by using code.
Install Your Google Tag with a Builder or CMS
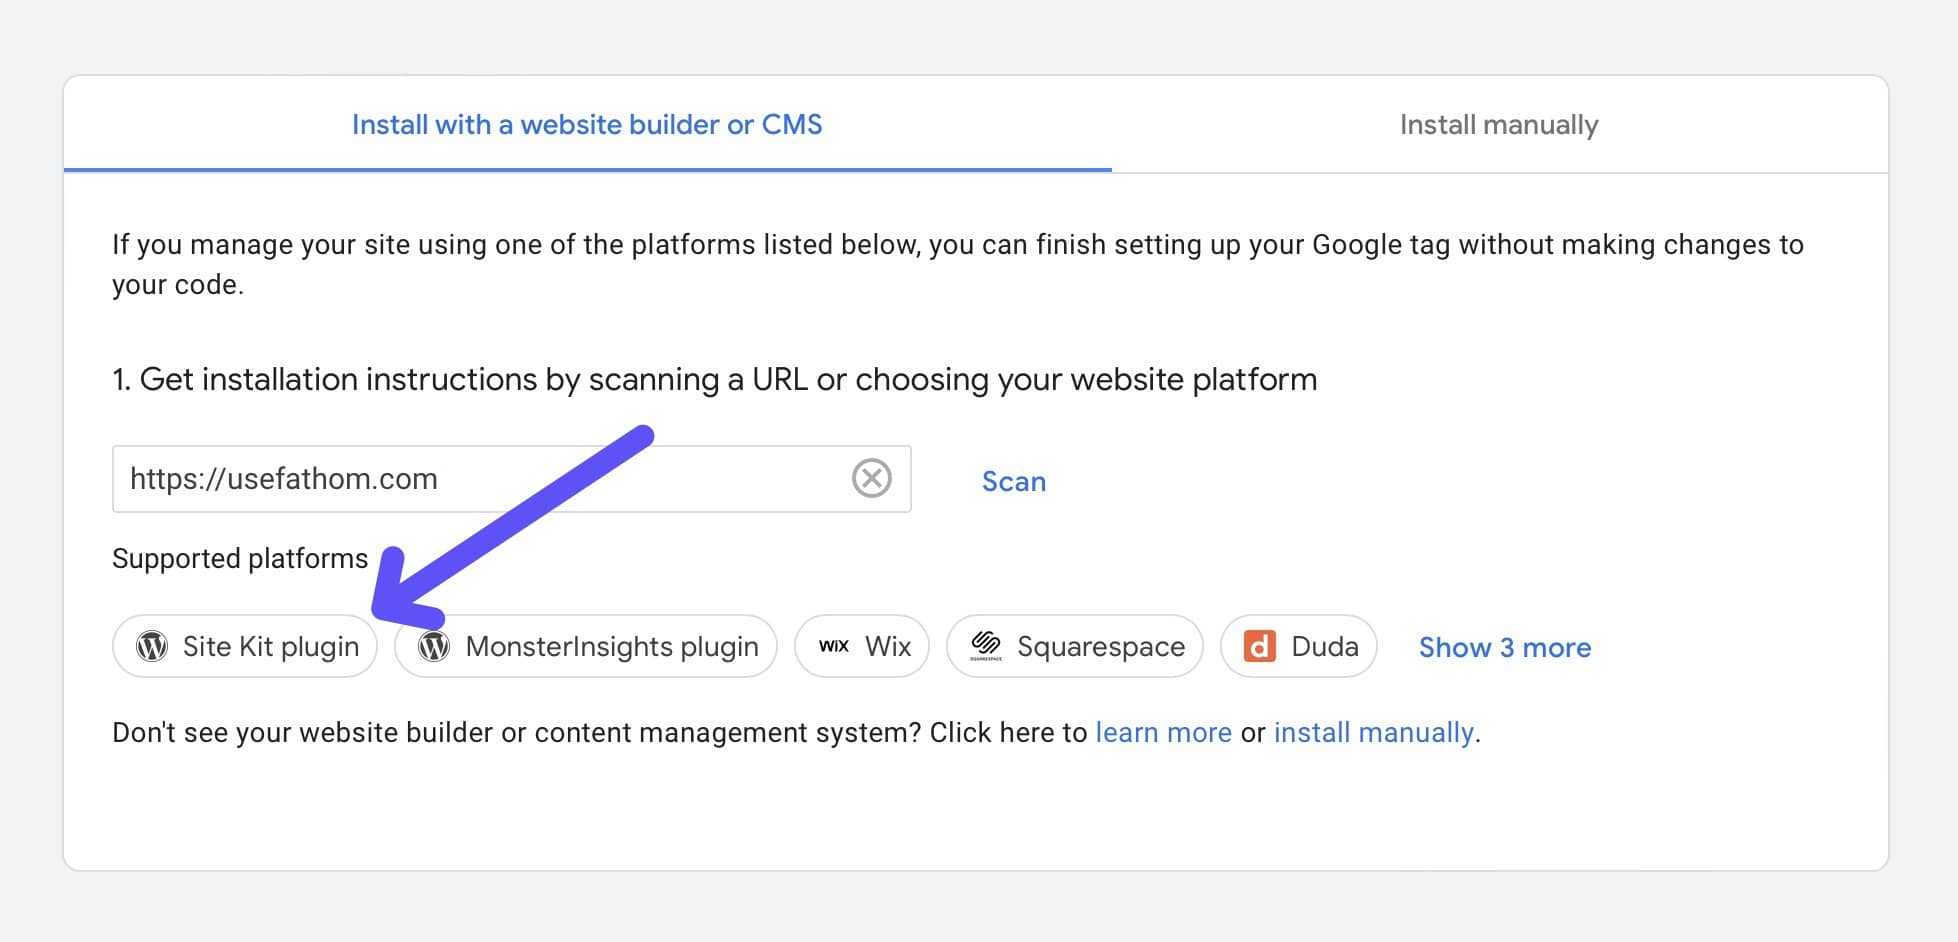
If you have, for instance, a WordPress Site, click on “Install with a Website Builder or CMS.”
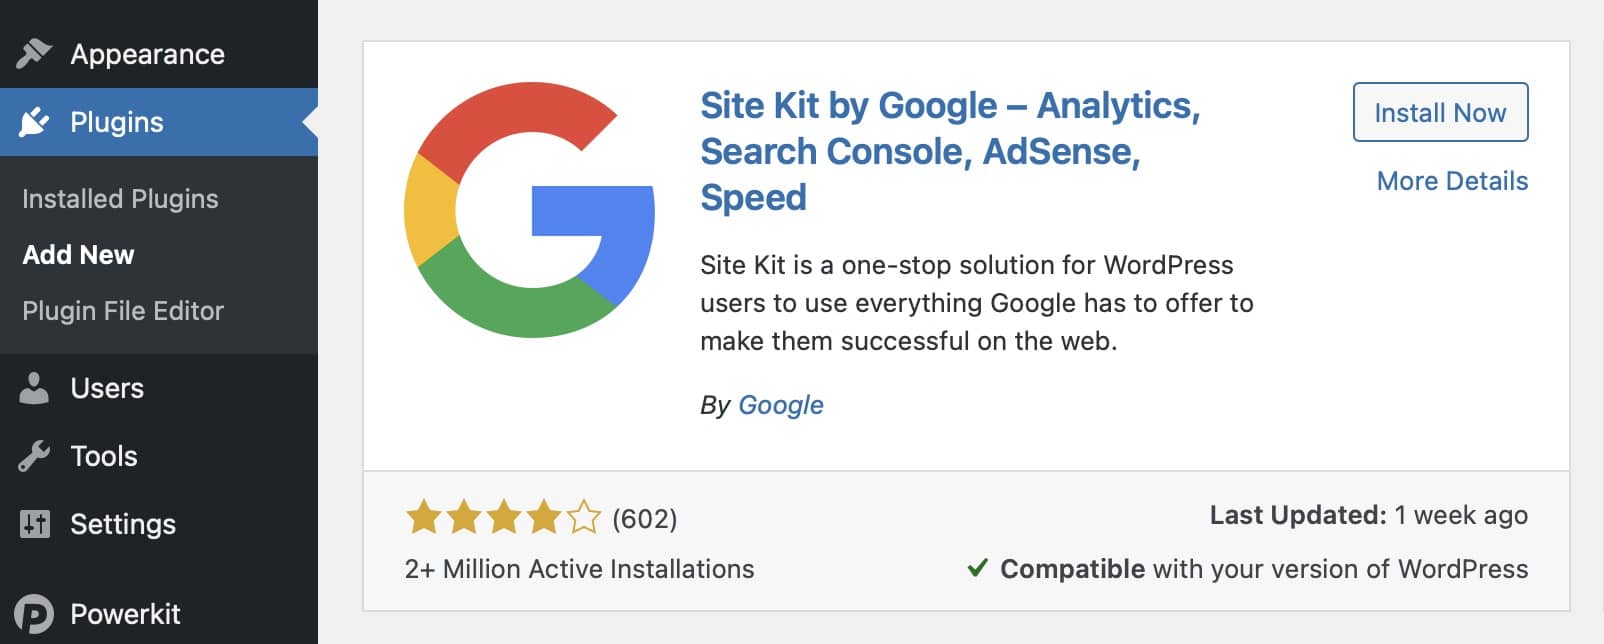
Look through the Supported Platforms, and, in this case, we’ll use the official Site Kit by Google WordPress Plugin.
You can access your WordPress Admin Panel, go to Plugins, select Add New, look for Site Kit by Google, install it, and activate it.
Site Kit will ask you to link your property using your email and credentials. Simply follow the steps until you get to Configure Analytics. Here, make sure you have your tag ID copied.
Lastly, paste the tag ID, and save your changes - your Google Tag Manager ID has been successfully implemented.
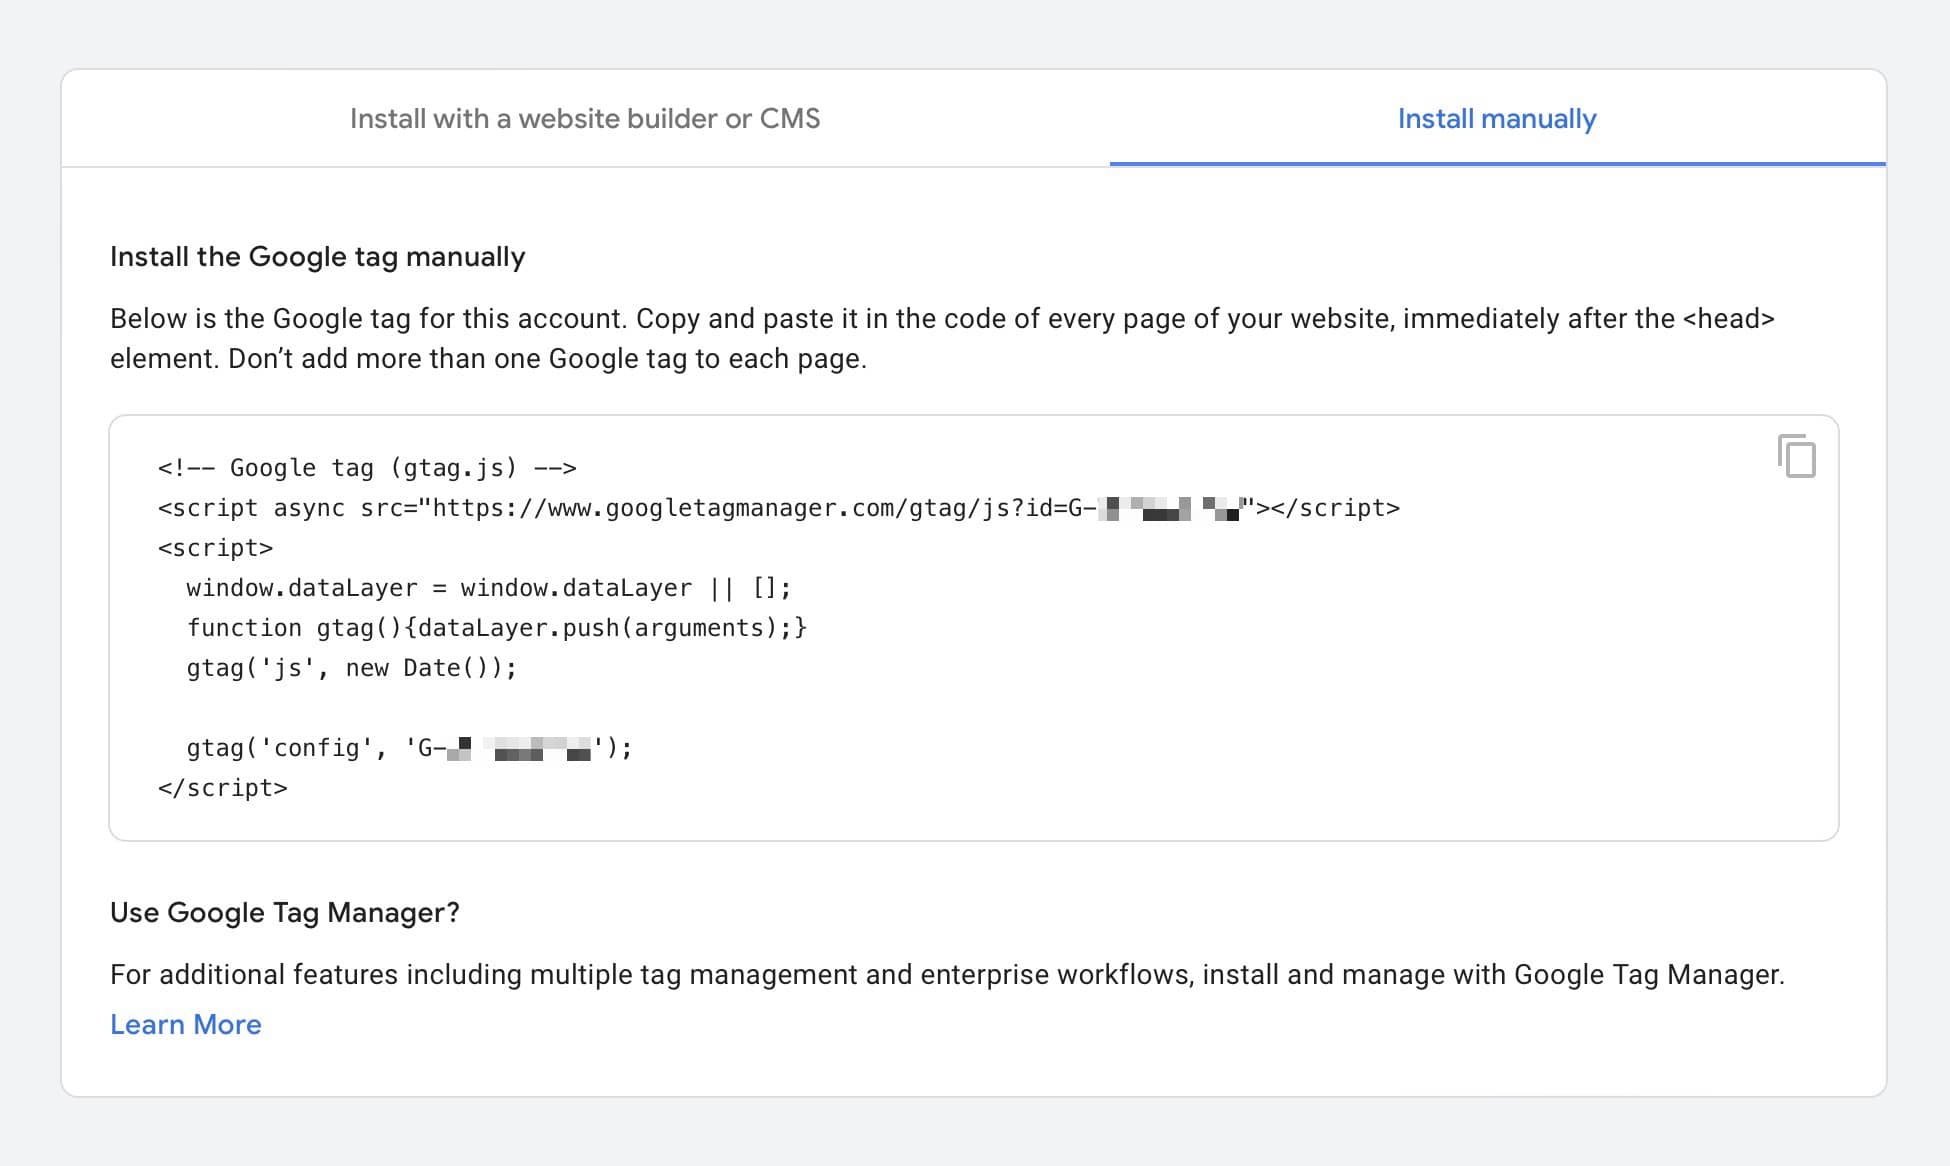
Install the Google Tag Manually
On the other hand, if you have a custom website, then you must install your Google Tag manually.
Click on “Install Manually,” and copy your specific Google tag related to your new GA4 property.
Make sure to add the code on every page of your website immediately after the element.
Step 6: Make Sure that Data Collection is Now Active
After implementing your GA4 property tracking code, go back to the main GA4 admin panel. If everything went alright, then you should see the following message:
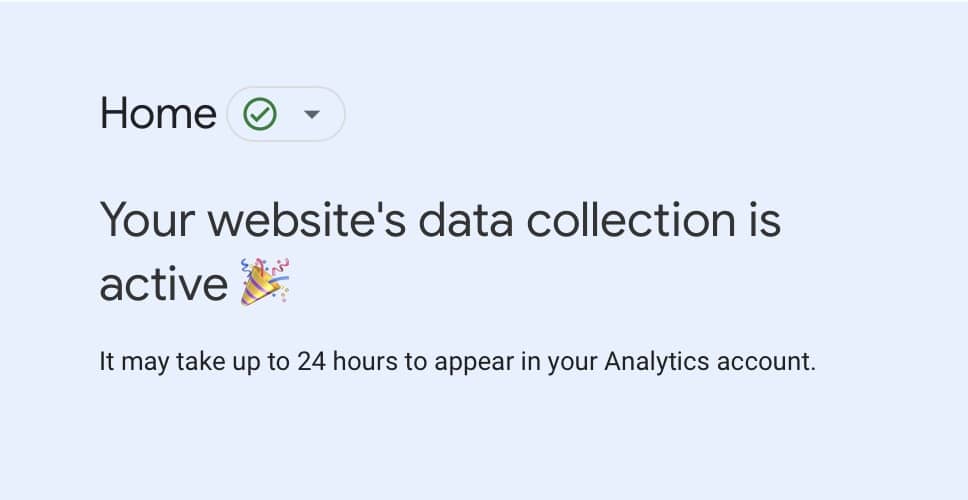
Note that it may take up to 24 hours to properly reflect recent changes on your GA4 property, so have some patience.
From now on, Google Analytics 4 will start collecting data on your website - that’s how you migrate from UA to GA4 easily!
5 Things to Do After Setting Up Your New Google Analytics Property
Migrating from UA to GA4 is one thing, but entirely setting up your new property is a completely different matter.
Since you cannot migrate historical data from UA to GA4 manually, you must follow Google’s UA to GA4 migration recommendations to ensure that everything goes as it should and you are not running into inconsistencies with your data.
1. Set Up Custom and Manual Events
One of the greatest features of GA4 is the fact that you can easily create GA4 events via user interface.
You are no longer limited to the old UA event scheme - event tracking is now more accurate and can be whatever you want.
Thus, identify the events you were using on UA, and replicate them on GA4 through the Event Menu. These can be YouTube video views, clicks on buttons, scrolling through a page, or all custom parameters that you want.
GA4 comes with a set of integrated events via the Enhanced Measurement feature, so make sure that you are not trying to create an event that already exists on GA4 beforehand!
2. Migrating Conversion Goals
UA Conversions were a little bit limited. Overall conversions were limited to 20 goals per report view, and with GA4, you can create up to 30 conversions per property.
Besides, creating conversions in GA4 is way easier: just create a custom event, go to the Events Table, and simply mark it as Conversion.
Identify your old UA Goals or Conversions, and replicate them in GA4.
3. Set Up Ecommerce Tracking
As you might guess, your old Ecommerce Tracking setups will not magically replicate from UA to GA4, so you need to set them up again.
Check out the new Ecommerce Tracking on GA4 guide by Google - it might take a while before you migrate everything from UA to GA4. Besides, your new Ecommerce Tracking parameters will only track after being created, which might limit your data comprehension for a few weeks.
4. Reconnect Google Products
It is imperative to manually reconnect your old Google products to your new GA4 property. This means that you must go to your Admin panel and link all products, such as Google Ads, BigQuery Integration, and more, from the very beginning.
Keep in mind that it is not necessary to remove Google Ads or other Google Products from Universal Analytics so you can connect them to GA4, so worry not.
5. Finish Basic Data and Privacy Settings
Lastly, you must finish all the other little tweaks on GA4 so it can accurately collect the data you need, as you did so in UA.
Things such as custom dimensions can either be user-scoped or event-scoped now; you can create brand new content groups, and set up more accurate, event-based User IDs for cross-device reporting.
When it comes to privacy, our recommendation is to set up data retention and data deletion parameters efficiently. All in all, GA4 has more privacy-focused options than UA.
Bonus: Use DebugView in Google Analytics 4
Google Analytics 4 has an option called DebugView that shows you all the events and user properties that take place on your website in real time.
After you are done setting up the basics (and the not-so-basic) factors that you’ll need in Google Analytics 4, go to the Debugging Screen, and check how things are going.
This isn’t a mandatory step, but it is highly recommended if you want to ensure that all things on your website or app as working as they should
Summary: UA to GA4 Migration Process
Migrating from UA to GA4 is not hard if you just do the basics, but as we know, measuring data goes beyond the standard things that everyone does - that’s what is going to put you one step ahead of your competition.
Although we all know that both GA4 and UA’s interfaces are not the most user-friendly ones out there, it is imperative to make the change if you seek to continue using Google products.
Sometimes, changes are necessary if you don’t want to be left behind in an always-evolving online world, and moving from UA to GA4 is, indeed, a necessary change.

BIO
Paul Jarvis, author + designer